Saturday, February 25, 2012


Hello again,

Thanks for looking in on my blog once more.  After looking at the pictures on my monitor, I can tell there are a few spots that require some touch-up airbrushing. You may not be able to see them, but I can (trust me).  This project has been a been a while in the making, so I am delighted that progress is finally being made.


The wing leading edge had previously been painted yellow before masking.  This was a recognition feature of RAF Day Fighters in North West Europe during World War 2, as was the “Sky” colored band around the rear fuselage; on the actual fighter aircraft these bands were 18 inches wide, so the mask had to be carefully measured.  With the masks off, these features stand out and really help the model look like it is nearing completion.


The other item that is often represented as decals but seldom look very good, are the walkway lines on the wing upper surface.  I cut strips of Tamiya tape on glass with a sharp No. 11 Xacto blade, guided by a steel straight edge. I placed these next to where the walkway lines go, and then added more 3M yellow tape along the masked area.  I was able to spray a thin airbrushed line of Tamiya XF-69 “NATO” Black.  When the masks were lifted, I had an even, sharp walkway line of consistent width. 


Some artwork would have you believe that these lines were painted over the Dull Red and Dull Insignia Blue roundels on the wing, but I am not buying that. I will place my decals on top of the painted lines.


As stated earlier, there is just a small amount of touch up to address, but I am satisfied at how the project has come together thus far.  I hope in the next week or so to start putting a coat of clear gloss finish on the model, in preparation for placing the decals into position.  

Until then, be safe and happy modeling!

Marty 


Thursday, February 23, 2012

With the Spitfire’s undersurfaces painted in Tamiya’s XF-83 Medium Sea Grey and appropriately post-shaded (as described earlier), I masked the fuselage camouflage demarcation line according to reference photographs & drawings.  Early Spitfire Mark IX’s appear to have had the “MSG” extend over the bottom of the rudder, a fact I had never noticed before.  A few strips of Tamiya tape were placed to match the demarcation line, and the masks were on.  I was also careful to mask the wing fillet training edge, extending into the Spitfire’s distinctive underside gull wing contours, where the flaps meet the fuselage.  The undersurface of the horizontal stabilizers and elevators were also covered to protect them from overspray as well. 


I then airbrushed the Tamiya XF-82 RAF Ocean Grey along these areas first, before flipping the model right side up and covering the majority of the upper surfaces with this color.  I also removed the paper towel from the cowling so I could position the magnetized cowl panels, so that in painting the camouflage pattern, it would line up on these pieces. 

You’ll see just a bit of primer around the cockpit area, because I new this was a place that would end up being painted green. All Ocean Grey areas received the usual post shade treatment as described earlier: base color, a darker version of base color and then a lightened version of the base to go on the highlighted areas. 


I used a pencil to mark where the camouflage of Tamiya XF-81 RAF Dark Green would go, carefully matching the pattern drawings.  Using the pencil lines as a guide, and with my Tamiya HG SF double action airbrush set on as fine a pattern as I could sustain, I started laying down the color separations, free hand by airbrush. 


I found myself spraying Dark Green into the body of these areas because I didn't want to get confused about which side of the pencil lines to paint!  This is something you really want to pay attention to, particularly if your vision is caged inside of an optivisor; you occasionally need to pop up to take look around the model to make sure you are still spraying in the right place.  I sprayed the paint into the insides of all the Dark Green blotches until the color density was gradually built up.  I also painted the cowling panels and the canopy frames off the model.  Once I had the Dark Green on, it too received the subtle post-shade treatment. 


Some touch up is required here and there, with both colors.  Just keep at it, correcting the goofs as you find them until you find your happy place.  

And so there you are, a nearly complete painted Spitfire model. Next, peel away the masks!  Not entirely unlike unwrapping a Christmas present, and just about as much fun. 

Happy modeling,
Marty


Saturday, February 18, 2012

Painting started on the Tamiya 1/32 Spitfire IX


Hello model Spitfire enthusiasts,

Right about now you are saying to yourself – “What, Marty Sanford builds models?” The blockages to forward progress on this project, much like writers block, have been abundant in both quantity and variety.  I could write an equally long passage about what I have been doing instead of building over the last several months, but I suggest we skip that and get on with the description of work performed so far. 

I was at the stage of airbrushing primer when I checked in with you last.  I will confide that my least favorite part of model building is in sanding seams, finding and fixing flaws, re-priming, detecting more seams that I had previously missed and then repeating the process over again.  I used super glue and accelerator to fill the hairline cracks, followed up with working them over with sanding sticks of ever decreasing grit, and wet-sanding & smoothing out with film and sanding pads all the way down to 4000 grit.  The first two pictures in this series are the payoff for all that drudgery though.  Clean, clear primer with all those dreaded seams gone, no more to be seen showing through the paint work.  I celebrated with a bottle of Sam Adams Boston Lager. Or maybe two.  It's easy to loose count...


If seams are my least favorite thing, then airbrushing has to be one of my favorite modeling skills. All paints are Tamiya acrylics, mixed to match the shade I was after.  I always spray a coat of flat white underneath anytime I spray yellow.  I chose to airbrush the Yellow wing leading edge stripes and the “Sky” fuselage band (same color as the spinner) before masking them off, instead of using the kit supplied decals for these markings. Take a look at these in the third photo, because they won’t be seen again until the masks come off!  Once these had cured for a day, I used Tamiya tape to mask these areas.  I also wrapped the engine area with a paper towel and taped it in place.
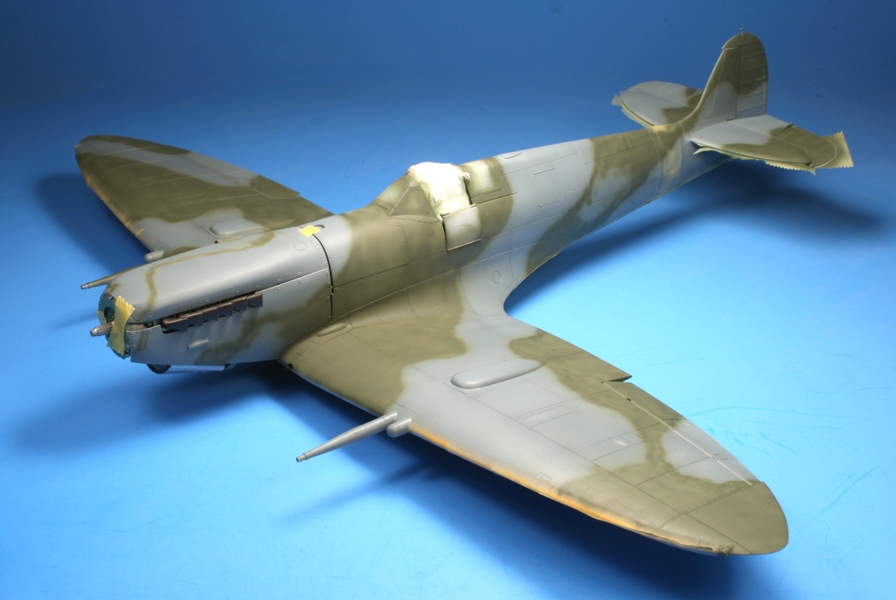


RAF Temperate camouflage in Northern Europe called for the undersides of Fighter aircraft to be painted in Medium Sea Grey by this stage of the Second World War.  I started with airbrushing the undersurfaces of my Spitfire, spraying a base coat of Tamiya XF-83 Medium Sea Grey, thinned with isopropyl alcohol.  I also added just a few drops of Gunze Sangyo “Mr. Color Thinner”, a Japanese-produced lacquer thinner that smoothes the flow out and results in a slightly semi-gloss sheen.  The following image illustrates this step. I am still undecided if I like the Tamiya rendering of RAF MSG here or not.  The color looks “warmer” than what I am used to, but I will think this over again before I move in the paint work too far.  Ever notice how the Brits spell Grey with an “e”, while Americans nearly always spell it Gray with an “a”?  I tend to use official color names as much as possible, so if I refer to a specific British MAP color (colour) name, I use their spelling, and vice-versa for US colors.  Thank you, Noah Webster.


With the airbrush cup still loaded with Medium Sea Grey, I added several drops of XF-69 “NATO Black”, and sprayed this color along all the panel lines and natural creases & folds on the underside of the airframe.  I started over with a clean color cup with XF-83 again, but added a splash or two of XF-2 Flat What, with just a few more drops of Mr. Color Thinner.  This thinned mixture isn’t meant to hide everything underneath, just to add a final transparent layering of uniform sheen, paying particular attention to the highlighted areas while intentionally not concentrating paint build up on the panel lines and shadow areas.  The object is to build the paint work in semi-transparent layers, giving an illusion of grime accumulation and oxidation.  There will be more filth to come, as in-service military aircraft always display their share of stains and oil smears on their bellies. 


Next: Masking the separation line, and on to the first of the upper surface camouflage colors, RAF Ocean Grey! 

Marty